Angular Animations Tutorial: Disable and Enable Animations
I’m willing to bet, that if you’ve spent very much time working with Angular animations, you’ve had the need or desire to disable them for one reason or another. Something that I encounter quite a bit are animations that run on component initialization. I may only expect them to run when an interaction occurs, or when data changes, or something along those lines. I don’t expect them to run on initialization, but they do anyway. Well, this is something that I’m going to show you how to fix in this post. Alright, let’s get to it.
Before We Get Started
Now, before we get too far along, it’s important to note that I’ve already created several posts focused on the animation framework in Angular.
Angular Animation Tutorials:
- Learn the Basics
- Enter and Leave Animations
- The Keyframes Function
- Query and Stagger Function
- Start and Done Events
- Parallel Animations
- Animating to an unknown height
- Adding Flexibility with Params
- Creating Reusable Animations
These posts cover many different animation topics so if any of these concepts look unfamiliar to you, you’ll probably want to check these posts out first so that you’re not lost in this example.
And, to make them easier to find, I’ve created an Angular Animations playlist on my YouTube channel to help, so check it out!
Ok, enough of that, onto the example for this post.
The Demo Application
Here, we’ll be using this Petpix demo application where people share cool images of their pets. As you click to look through the images, you can see the nice transition forward as you navigate to the “next” image. Then, when you navigate backwards with the “previous” button you can see that it animates nicely in the opposite direction.

So, this animation is cool when navigating between the images, but there is something happening that we don’t want. If we reload the application, we can see that the animation runs when the component is initialized.

We don’t want this, instead we only want it to run when navigating through the images. So, this is what we’re going to do in this post. We’re going to disable the animation until after the component fully renders, and then we’ll enable it.
Disabling Animations with the Disabled Animation Control Binding
Now, luckily for us, there’s a pretty simple way to do this built right into the framework. We can use a special [@.disabled] animation control binding. When this binding is bound with a value of true, it will prevent any animations from running on the element with the binding as well as any nested elements.
So, let’s take a look at our code. Here, in the template for the slider component, we have an animation called “slideToggle” bound on the div that contains all of the images.
slider.component.html
<div
    [@slideToggle]="{
        value: selectedImage(),
        params: {
            leaveEnd: animationDirection() === 'right' ? '100%' : '-100%',
            enterStart: animationDirection() === 'right' ? '-100%' : '100%',
            hiddenScale: 0.25
        }
    }"
    class="image">
    ...
</div>
So this is where we’ll add our disabled binding, but before we do, we need to add a Boolean property to bind it to. So let’s switch to the slider.component.ts and let’s add a protected property called “animationDisabled”. We’ll make it a signal with an initial value of true.
slider.component.ts
import { ..., signal } from "@angular/core";

@Component({
  selector: 'app-slider',
  ...
})
export class SliderComponent {
    protected animationDisabled = signal(true);
}
Ok, now we have the property, next we need to enable it after the component has completed its initial render. There are many ways we can do this, but for this example we’re going to use the afterNextRender() lifecycle hook.
To do this, we need to add a constructor. Then, within the constructor, we add the afterNextRender() function, and we’ll need to be sure it get’s properly imported from angular/core. Now, within the callback, if animationDisabled() is true, let’s set it to false.
import { ..., afterNextRender } from "@angular/core";

@Component({
  selector: 'app-slider',
  ...
})
export class SliderComponent {
    ...

    constructor() {
        afterNextRender(() => {
            if (this.animationDisabled()) {
                this.animationDisabled.set(false);
            }
        });
    }
}
Ok, that should be the logic we need to properly disable and enable our animation. So, let’s switch back over to the template. And now we can add the [@.disabled] binding, and we can bind to our new animationDisabled() signal.
slider.component.html
<div
    [@.disabled]="animationDisabled()"
    [@slideToggle]="{...}"
    class="image">
    ...
</div>
And that’s it. Now after we save, the animation should no longer run as the component is initialized. But, they should still run properly when navigating through the images in the gallery.
Animation Callback Events with Disabled Animations
Now there is something else you’ll want to be aware of, if you’re using the start and done AnimationEvent callback events for anything, they still run, even when the animation is disabled. They will just run with a zero duration.
To demonstrate this, let’s add a start and done event to our animation. In our slider.component.ts, let’s add a new function, let’s call it “animationEvent()”. Let’s pass it a “state” that will either be “start” or “done”. Then within this function, let’s simply log out the state.
slider.component.ts
@Component({
  selector: 'app-slider',
  ...
})
export class SliderComponent {
    ...

    protected animationEvent(state: 'start' | 'done') {
        console.log(`slideToggle: ${state}`);
    }
}
Ok, now let’s switch over to the template. On the div with our animation, let’s add a start event binding. Then let’s call our new function, and in this case, since it’s the start event, let’s pass it a value of “start”. And, let’s do the same for the done event.
slider.component.html
<div
    [@.disabled]="animationDisabled()"
    [@slideToggle]="{...}"
    (@slideToggle.start)="animationEvent('start')"
    (@slideToggle.done)="animationEvent('done')"
    class="image">
    ...
</div>
Ok, now after we save save, if we open the dev tools and look at the console, we can see that both our start and done events were logged out, meaning both events ran even though our animation was disabled.
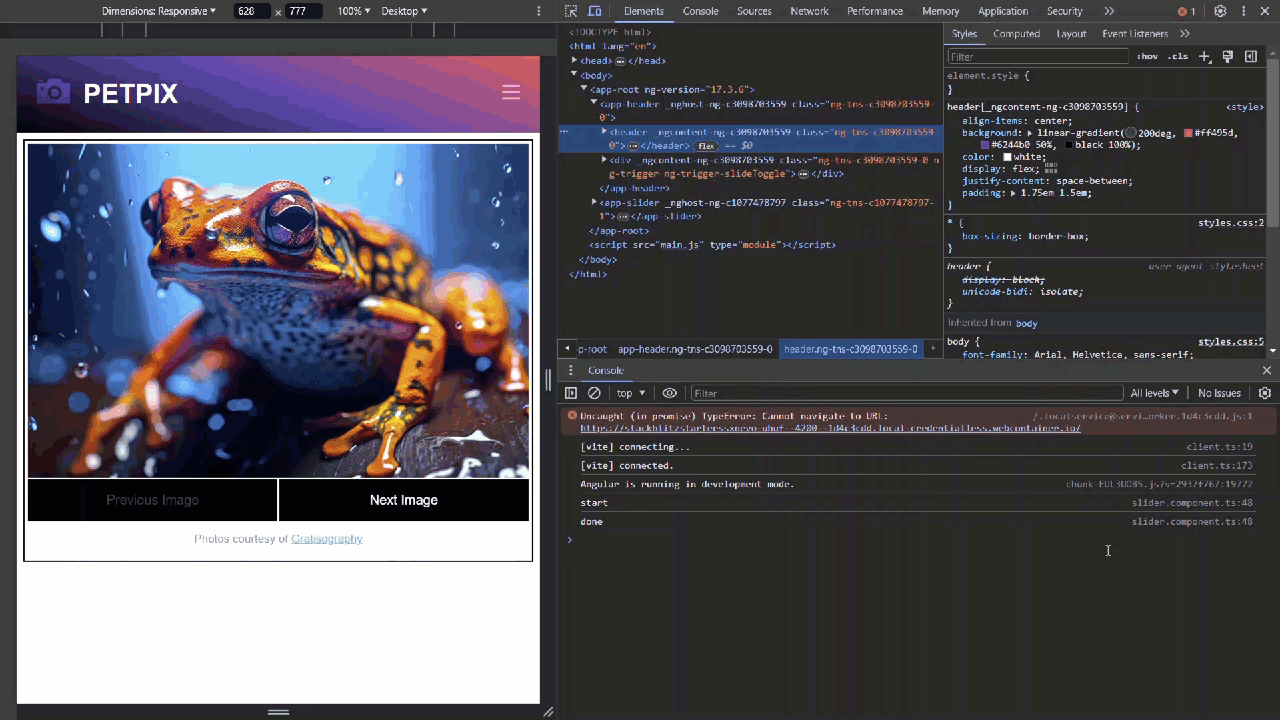
So, not a huge deal, but something to be aware of for sure. It’s definitely thrown me off in the past.
Conclusion
So now you should be able to disable animations whenever you don’t want them to run, and there’s lot’s of different ways you can do this. For example, you could add a setting to your app that allows the user to disable animations, and then you could set them disabled using the disabled control based on this setting.
Probably not something you’ll need every day but should come in handy from time to time.
Now, there’s still plenty more to cover on angular animations so I’ll go ahead and stop here for now, but keep an eye out for more posts in the future.
Want to See It in Action?
Check out the demo code and examples of these techniques in the in the Stackblitz example below. If you have any questions or thoughts, don’t hesitate to leave a comment.
Found any of this Stuff Helpful?
If you found any this helpful and want to show some love, you can always buy me a coffee!