I Deleted Half My Code When I Switched to Signal Forms
Building custom form controls with ControlValueAccessor requires multiple methods, providers, and boilerplate code, making simple controls unnecessarily complex. Angular's Signal Forms API simplifies custom controls dramatically, reducing code by up to 50% while improving type safety and reactivity. This tutorial demonstrates how to migrate a custom control from ControlValueAccessor to Signal Forms, showing how the new API eliminates boilerplate and simplifies form control development.
Angular Signal Forms Tutorial Series:
- Migrate to Signal Forms - Start here for migration basics
- Signal Forms vs Reactive Forms - See why Signal Forms are better
- Custom Validators - Add custom validation
- Dynamic Forms - Build dynamic forms
The Quantity Control in Action
Here’s the little demo app that we’ll be using in this example:
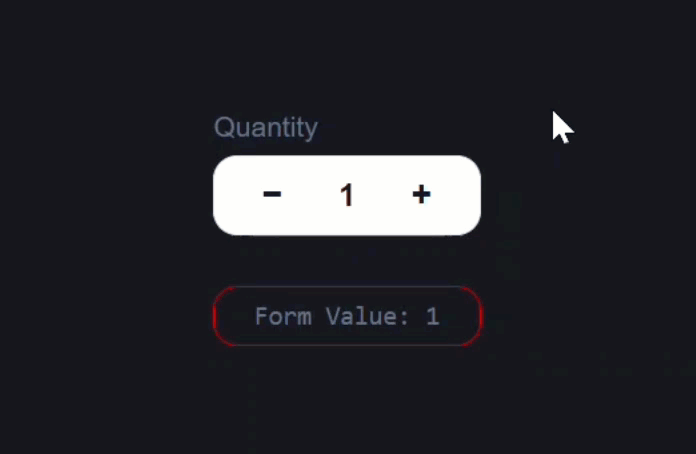
It’s just a basic quantity selector control.
Click the plus button, it goes up.
Click the minus button, it goes down.
And underneath the control, we’re logging out the form value, so as we change the quantity, you can see the number update instantly:
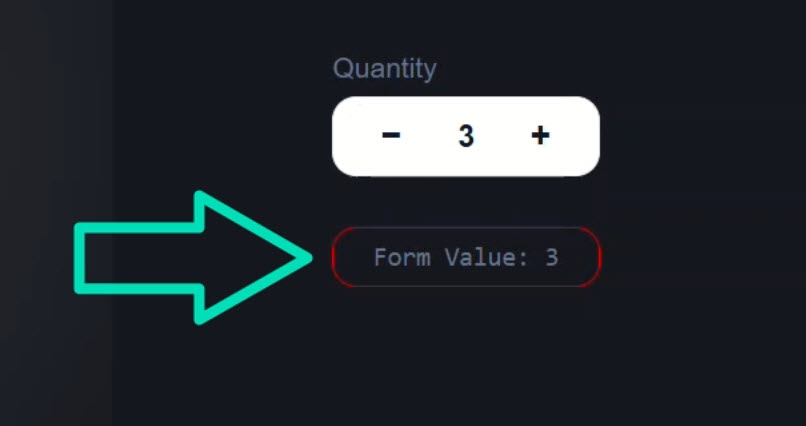
Everything works exactly as you’d expect.
So now let’s open this up and see how it’s all wired together currently.
How the Reactive Form Is Wired Up
First, let’s open up the template for the cart component.
Here we can see our quantity-stepper component with a form control bound to it, straight from Angular’s Reactive Forms module:
<app-quantity-stepper id="qty" [formControl]="quantity" />
Binding the control to this component means it’s a custom form control that uses ControlValueAccessor.
We’ll see more on that in a minute.
Next, we can see that we’re outputting the string-interpolated value of the quantity form control:
<pre>Form Value: {{ quantity.value }}</pre>
That’s the value that updates below as we adjust it:
Now, let’s jump to the TypeScript for this component.
We’ve got a FormControl named “quantity”, initialized with a value of 1, and a min validator that prevents the quantity from ever dropping below 1:
protected quantity = new FormControl<number>(1, {
    nonNullable: true,
    validators: [Validators.min(1)]
});
Pretty simple setup.
So far, everything here is standard Reactive Forms, but the interesting part is what’s inside that stepper component.
How a ControlValueAccessor Works (Before Signals)
Now this is where things get a little verbose.
Because this is a custom control, we need to make it talk to Angular’s form API using the ControlValueAccessor interface.
We’ve got a providers array registering NG_VALUE_ACCESSOR:
@Component({
    selector: 'app-quantity-stepper',
    ...,
    providers: [{
        provide: NG_VALUE_ACCESSOR,
        useExisting: forwardRef(() => QuantityStepperComponent),
        multi: true
    }],
})
That’s what tells Angular…
“Hey, this component knows how to act like a form control.”
Then our class implements the interface, which means we have to define several required properties and methods.
We track the value, track the disabled state, implement onChange and onTouched, handle writeValue, registerOnChange, registerOnTouched, and setDisabledState:
export class QuantityStepperComponent implements ControlValueAccessor {
    private _value = signal(1);
    value = this._value;
    isDisabled = false;

    private onChange: (v:number)=>void = () => {};

    private onTouched: ()=>void = () => {};

    writeValue(v: number | null): void {
        this._value.set(v ?? 1);
    }

    registerOnChange(fn: (v:number)=>void) {
        this.onChange = fn;
    }

    registerOnTouched(fn: ()=>void): void {
        this.onTouched = fn;
    }

    setDisabledState(disabled: boolean): void {
        this.isDisabled = disabled;
    }

    ...
}
That’s already a lot of code before we even get to our own logic.
At the bottom, we’ve got our custom methods: increment() and decrement():
protected increment() {
    this._value.update(v => {
        const n = v + 1; this.onChange(n); return n;
    });
}

protected decrement() {
    this._value.update(v => {
        const n = Math.max(1, v - 1); this.onChange(n); return n;
    });
}
Each one updates the internal _value signal and calls onChange so Angular knows about the new value.
It all works, but it’s way too much ceremony for something that just increments a number.
Template Setup for the Classic CVA Control
Over in the template, we’re binding a class when the control is disabled:
@let disabled = isDisabled;
<div class="stepper" [class.is-disabled]="disabled">
    ...
</div>
Inside that wrapper, we’ve got a minus button, the displayed value, and a plus button:
<button
    type="button"
    class="btn btn-minus"
    (click)="decrement()"
    [disabled]="disabled"
    aria-label="Decrease quantity">−</button>
<span
    class="qty"
    role="spinbutton"
    [attr.aria-valuenow]="value()"
    aria-valuemin="1"
    tabindex="0">{{ value() }}</span>
<button
    type="button"
    class="btn btn-plus"
    (click)="increment()"
    [disabled]="disabled"
    aria-label="Increase quantity">+</button>
There’s no native HTML control like this, so we had to build our own numeric input with custom increment and decrement buttons.
Now that we understand what we’re working with, let’s modernize it.
Our Plan to Upgrade to Signal Forms
We’re going to migrate this quantity stepper and the form that uses it to Angular’s new experimental Signal Forms API.
Signal Forms are brand new and only available in Angular 21+ (next builds).
And for the concepts we’ll be using in this tutorial, you’ll need Angular 21.0.0-next.8 or later.
They’re experimental, but the future is coming fast!
Let’s see how we can make this control fully signal-driven.
Refactoring the Custom Control to Signal Forms
Back in the TypeScript, we can remove the entire providers array. No more NG_VALUE_ACCESSOR.
We can also delete the old Reactive Forms imports as well.
Next, we’ll replace the ControlValueAccessor interface with the new FormValueControl interface from the @angular/forms/signals package:
import { FormValueControl } from '@angular/forms/signals';

export class QuantityStepperComponent implements FormValueControl<number> {
    ...
}
Now for the satisfying part we get to delete a lot of code.
No more callbacks, no more registration methods, no more writeValue or setDisabledState.
It all goes!
Then, we’ll convert our value property into a model input to automatically sync the value between the form and this component, and it’s required by the FormValueControl interface:
import { ..., model } from '@angular/core';

value = model(1);
We’ll turn our isDisabled property into an input:
import { ..., input } from '@angular/core';

isDisabled = input(false);
We’ll simplify increment() and decrement() methods too. No more onChange, just update the signals:
protected increment() {
    this.value.update(v => v + 1);
}

protected decrement() {
    this.value.update(v => Math.max(1, v - 1));
}
Clean, readable, reactive.
Adapting the Template for Signal Inputs
Now, in the template, we only need one change, the isDisabled property should now be called like a signal:
@let disabled = isDisabled();
Everything else stays exactly the same. Same UI. Same behavior.
Rewriting the Cart Component with Signal Forms
Next, let’s migrate the form itself.
In the cart component, we can now remove the old FormControl and Reactive Forms imports.
We’ll create a signal called model to hold the form’s state object:
import { ..., signal } from '@angular/core';

protected model = signal({ quantity: 1 });
Then we’ll use the new form() function from the Signal Forms module to build the form:
import { ..., form } from '@angular/forms/signals';

protected cartForm = form();
We’ll pass our model signal and add validations with the required() and min() functions also from the Signal Forms module:
import { ..., min, required } from '@angular/forms/signals';

protected cartForm = form(this.model, schema => {
    required(schema.quantity);
    min(schema.quantity, 1);
});
Now we have a fully reactive form object based on signals with validators applied.
Then we’ll import the new Field directive which we’ll use to replace our old FormControl binding:
import { ..., Field } from '@angular/forms/signals';

@Component({
    selector: 'app-cart',
    ...,
    imports: [ ..., Field ]
})
Replacing formControl with the New field Directive
In the template, we’ll replace the old binding with the new field directive instead:
<app-quantity-stepper id="qty" [field]="cartForm.quantity" />
We’ll also update the string-interpolated value to reference the new form object:
<pre>Form Value: {{ cartForm.quantity().value() }}</pre>
Last but not least, we’ll update the validation message binding too.
@if (cartForm.quantity().invalid()) {
    ...
}
That’s it, let’s test it out:
Nice! Everything still works. Click up, click down, model updates live.
But right now, we can’t actually trigger our validation because our decrement logic prevents the value from going below 1.
That’s our min() validatior working like it should.
But now, we want to test this validator out.
Validating and Debugging the Signal Form
So, let’s remove the guard in the decrement method:
protected decrement() {
    this.value.update(v => v - 1);
}
Okay, let’s save and try it out:
Now, when we click below 1, the validation kicks in.
So this is all pretty slick, right?
Everything works just like before…
✅ But now powered entirely by signals
✅ No manual callbacks
✅ No NG_VALUE_ACCESSOR
✅ No boilerplate
Why Signal Forms Are the Future of Angular Forms
We went from a ControlValueAccessor implementation that required multiple functions, a provider, and a lot of plumbing… to a signal-based control that’s just a few lines of code.
Signal Forms are easier to reason about, more declarative, and integrate perfectly with Angular’s modern reactive system.
If you found this helpful, be sure to subscribe, and let me know how you’re feeling about Signal Forms in the comments.
Join the Angular builders’ union: get the limited Shieldworks “United by Craft” tees and hoodies and help keep new tutorials coming every week! They’re built for the ones who code like it’s a trade!
Additional Resources
- The demo app BEFORE any changes
- The demo app AFTER making changes
- Angular Signal Forms GitHub (Experimental)
- Angular ControlValueAccessor Docs
- My course “Angular: Styling Applications”
- My course “Angular in Practice: Zoneless Change Detection”
- Get a Pluralsight FREE TRIAL HERE!
Try It Yourself
Want to experiment with the final version? Explore the full StackBlitz demo below.
If you have any questions or thoughts, don’t hesitate to leave a comment.