Migrate Reactive Forms to Signal Forms
Angular's experimental Signal Forms API provides a more reactive, type-safe alternative to Reactive Forms, eliminating boilerplate and improving performance. This tutorial demonstrates how to migrate a real-world Reactive Form to Signal Forms, showing step-by-step how to convert FormGroups, FormControls, validators, and error handling. You'll learn how Signal Forms simplify form state management while maintaining the same user experience.
Angular Signal Forms Tutorial Series:
- Signal Forms vs Reactive Forms - See why Signal Forms are better
- Custom Validators - Add custom validation to Signal Forms
- Async Validation - Handle async validation in Signal Forms
- Cross-Field Validation - Validate across multiple fields
- Dynamic Forms - Build dynamic forms with Signal Forms
- Custom Controls - Migrate custom controls to Signal Forms
- State Classes - Use automatic state classes
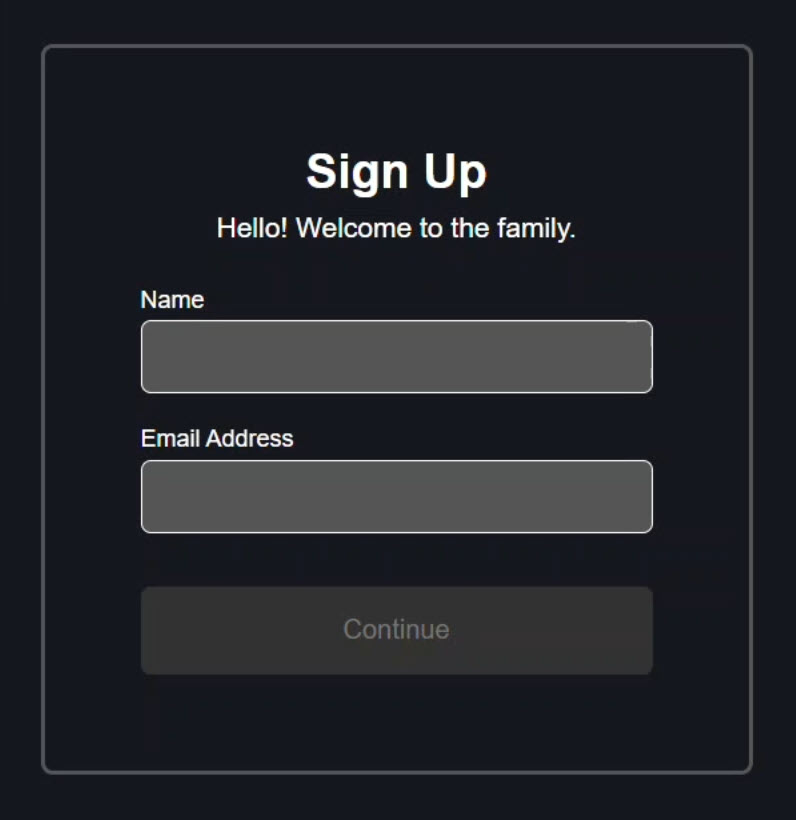
Demo Preview: Signup Form Behavior
First, let’s take a look at the app that we’ll be working on.
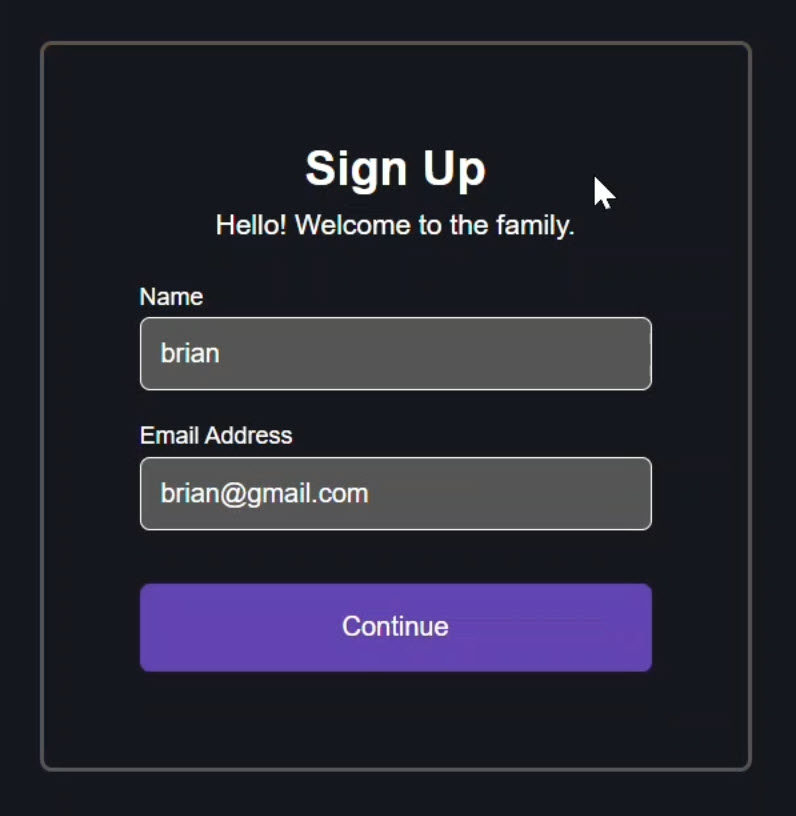
It’s a very basic signup form:
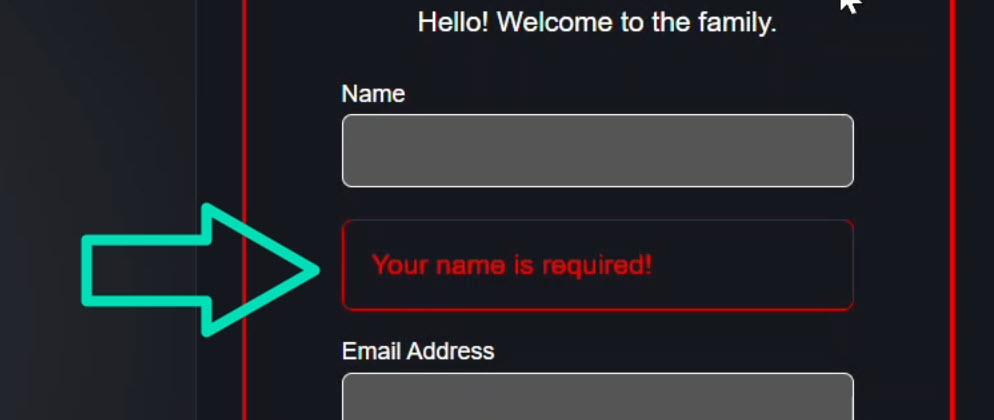
When we click into the name field and then blur it, we see an error message letting us know that this field is required:
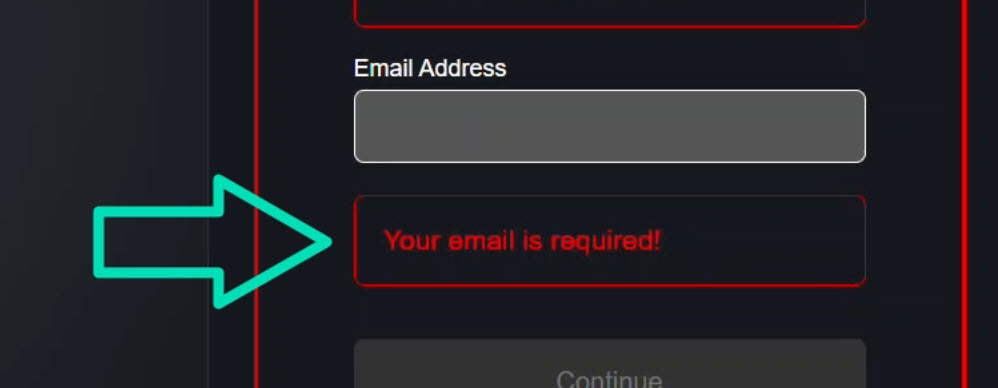
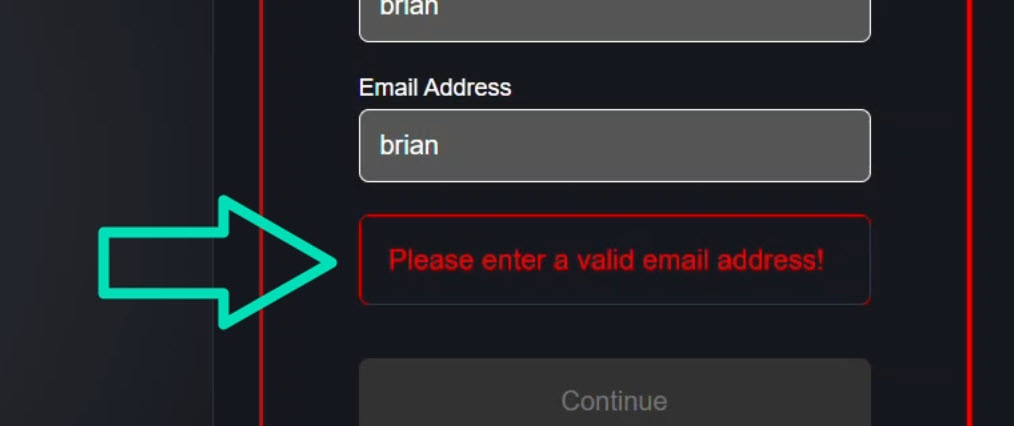
Then when we focus and blur the email field, same thing:
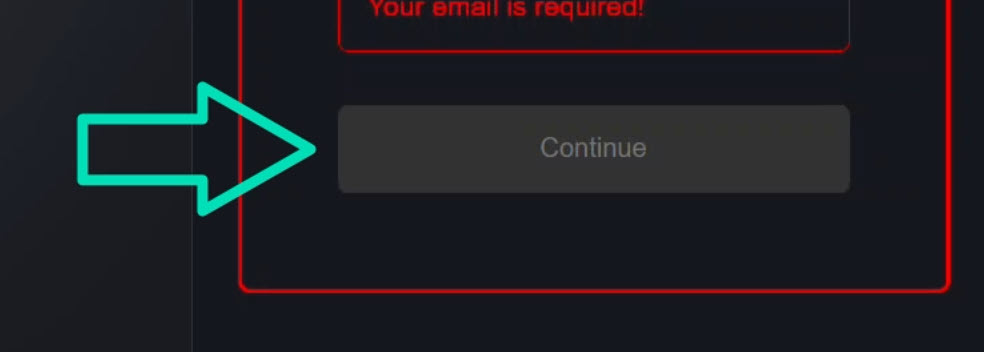
Also, while this form is invalid, the submit button appears disabled:
Once we add a valid name, the error message goes away.
For the email, once we enter a value, the error message changes if we have a value that’s not a valid email address:
Once we have the correct email format, that error goes away and the button becomes enabled:
Currently, this is all done using Reactive Forms which are great, but the bummer is that they don’t use signals, right?
And this is why we want to switch over to signal-based forms.
First, though, let’s look at the code to get a better understanding of how everything works currently.
Reactive Forms Setup: TypeScript and Template
In the component’s TypeScript, we can see the form property that is composed with a FormGroup, the classic Reactive Forms API:
protected form = new FormGroup<SignUpForm>({
    ...
});
Inside it, we have a name FormControl that expects a string and is required:
name: new FormControl<string>('', {
    nonNullable: true,
    validators: Validators.required
})
Then we have the emailAddress FormControl that also expects a string, is also required, and includes an email validator to make sure it’s a valid format:
emailAddress: new FormControl<string>('', {
    nonNullable: true,
    validators: [
        Validators.required,
        Validators.email
    ]
})
That’s why we got two different error messages depending on the state.
In the template, we have a class that’s added based on the form’s validity and “touched” state:
<article [class.invalid]="form.invalid && form.touched">
    ...
</article>
That’s how we get the red border when validation kicks in.
We’re using the formGroup directive to bind our form on a wrapper div:
<div [formGroup]="form">
    ...
</div>
This wires the template to the Angular FormGroup.
The name field uses the formControlName directive:
<input type="text" formControlName="name" />
Below that, we have the validation message that shows when the name control is invalid and “touched”:
<div
    [class.visible]="name.invalid && name.touched"
    class="error">
    Your name is required!
</div>
Then we have the same setup for the email field.
We have the input bound to the emailAddress control:
<input type="email" formControlName="emailAddress" autocomplete="none" />
Then its validation shows when the control is invalid and “touched” as well, but the message is a little different:
<div
    [class.visible]="emailAddress.invalid && emailAddress.touched"
    class="error">
    @if (emailAddress.hasError('required')) {
        Your email is required!
    } @else {
        Please enter a valid email address!
    }
</div>
In this case we need to show either the “required” message or the “improper format” message.
Below all of this, the button gets a “disabled” class whenever the form isn’t valid:
<button [class.disabled]="form.invalid">Continue</button>
So that’s our “before”, now let’s switch this to signal-based forms!
Heads-Up: Signal Forms Are Experimental (Angular v21+)
Before we change anything, it’s important to note that Signal Forms are currently experimental!
The API may still change because the Angular team is iterating quickly, but this gives us an early look and a chance to provide feedback.
Use with caution in production!
You’ll also need Angular v21 or a compatible next build to access these features.
Migration Step-by-Step: Reactive → Signal Forms
Back in the TypeScript, we’ll migrate the form model to signals and validation to the new schema style.
First, we’ll update the interface for the form object switching from FormControl types to plain strings:
Before:
interface SignUpForm {
    name: FormControl<string>;
    emailAddress: FormControl<string>;
}
After:
interface SignUpForm {
    name: string;
    emailAddress: string;
}
This makes the data a simple, serializable object, perfect for signals.
Then, we’ll remove the entire form group and its controls. We won’t need them anymore.
We can also remove the ReactiveFormsModule from the component imports and delete the old form imports.
Now, we’re ready to bring in the new Signal Forms features.
Signal Forms vs Reactive Forms: Key Differences
In classic Reactive Forms, your mental model is a tree of classes (form groups and form controls), and you subscribe to observables to react to updates.
With Signal Forms, the mental model shifts to:
- A plain data object wrapped in a signal (your single source of truth for form values)
- A form wrapper that gives you field-level signals for state (invalid, touched, errors) and value
- Template bindings that read these signals directly: no observables, no
formControlName, and noformGroupwrapper
TypeScript: Model Signal, form(), and Validators
First, in the template, we’ll be using a new Control directive, so let’s add it to the component imports array:
import { Control } from '@angular/forms/signals';

@Component({
    selector: 'app-form',
    ...,
    imports: [ Control ]
})
Next, let’s create a signal for the form’s data model, a single source of truth holding the form values as a plain object:
protected readonly model = signal<SignUpForm>({
    name: '',
    emailAddress: ''
});
The form layer will keep this in sync with the actual inputs automatically.
No manual subscriptions or setters.
Then, we’ll create a property for our form using the new form() function from the Signal Forms module.
import { ..., form } from '@angular/forms/signals';

protected readonly form = form(this.model, schema => {});
It wraps our model signal and provides form-level reactivity.
Next, we’ll define a custom validation schema using the new validation functions.
We’ll make the name field required with a custom error message using the new required() function:
import { ..., required } from '@angular/forms/signals';

protected readonly form = form(this.model, schema => {
    required(schema.name, {
        message: 'Your name is required!'
    });
});
We’ll need to do the same for emailAddress:
protected readonly form = form(this.model, schema => {
    ...
    required(schema.emailAddress, {
        message: 'Your email is required!'
    });
});
Then, in the case of the emailAddress control, we need to add an additional email format validator, right?
Well, we can use the new email() validator function for this:
protected readonly form = form(this.model, schema => {
    ...
    email(schema.emailAddress, {
        message: 'Please enter a valid email address!'
    });
});
Each rule defines both the condition and the message that appears when it fails.
With that, our form logic is fully converted to signals.
Template: [control] Directive and Error Messages
Now let’s update the template.
So now, the form property is a signal so we need to add parentheses to this property in the class binding.
Both invalid and touched are signals now too:
<article [class.invalid]="form().invalid() && form().touched()">
    ...
</article>
With signal-based forms, we no longer have the need for the formGroup directive so we can just remove that.
Before:
<div [formGroup]="form">
    ...
</div>
After:
<div>
    ...
</div>
Next, we used to need to access the controls object to access the specific control from a form:
@let name = form.controls.name;
@let emailAddress = form.controls.emailAddress;
But not anymore, so both of these variables can be shortened:
@let name = form.name;
@let emailAddress = form.emailAddress;
For the name field, we’ll replace formControlName with the new [control] directive:
<input type="text" [control]="name" />
The error message classes now rely on signals, and we’ll use the errors array with its message property to show the proper validation text:
<div
    [class.visible]="name().invalid() && name().touched()"
    class="error">
    {{ name().errors()[0]?.message }}
</div>
We’ll do the same for the email field: swap in the [control] directive:
<input type="email" [control]="emailAddress" autocomplete="none" />
Then we’ll update bindings to use signals, and simplify error message rendering:
<div
    [class.visible]="emailAddress().invalid() && emailAddress().touched()"
    class="error">
    {{ emailAddress().errors()[0]?.message }}
</div>
Finally, the submit button’s disabled class will also bind to a signal:
<button [class.disabled]="form().invalid()">Continue</button>
To better visualize how the form and model interact, we’ll add the JSON output of our model signal right in the template, super helpful for debugging and understanding signal flow:
<pre>{{ model() | json }}</pre>
Live Test: Validate, Errors, and Button State
Let’s save and try it out!
Click into the name field and blur, nice! The error message shows up:
Let’s do the same for the email address:
Still works!
The button is disabled while invalid, just like before:
Now, let’s type a valid name:
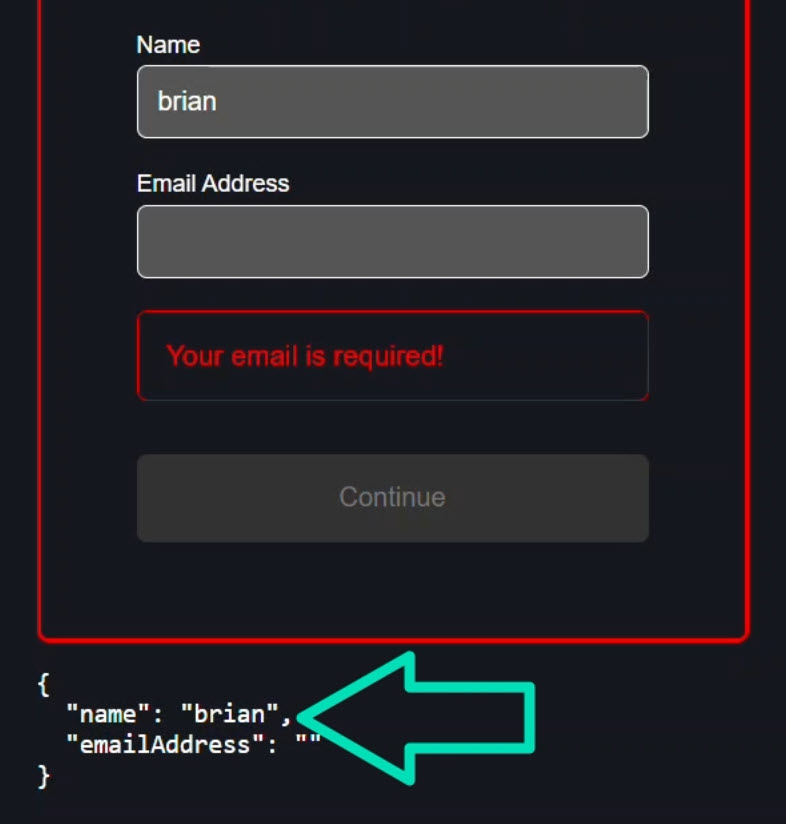
The error disappears, and the model signal updates immediately in sync with what we type.
That’s all thanks to the new signal-based form() function.
When we enter an invalid email, we still get the proper message:
And once we fix it, everything updates:

The button enables, and the UI reacts instantly.
Same behavior, but now fully signal-native.
No more FormGroup or FormControl ceremony in the class, and our validation messages live right next to the rules that trigger them.
Wrap-Up: Takeaways, Gotchas, and Next Steps
We just migrated a real-world, user-facing form from Reactive Forms to the new, experimental Signal Forms using:
- A simple data model signal
- A clean schema with error messages
- Tight, readable template bindings
And there’s still so much more we can do, like adding custom validators, stacking multiple errors, or even wiring up form submission as a signal.
This is a huge step forward for Angular’s reactivity story, and it’s exciting to see where it’s headed.
If you found this helpful, be sure to subscribe, and let me know how you’re feeling about Signal Forms in the comments.
Additional Resources
- The demo app BEFORE any changes
- The demo app AFTER making changes
- Prototype of Signal-Based Forms
- Angular Signals Overview (Official)
- Elisa Schnabel — “Angular Signal Forms: The Most Awaited Feature is Here”
- My course “Angular: Styling Applications”
- My course “Angular in Practice: Zoneless Change Detection”
- Get a Pluralsight FREE TRIAL HERE!
Try It Yourself
Want to experiment with the final version? Explore the full StackBlitz demo below.
If you have any questions or thoughts, don’t hesitate to leave a comment.