"Reactive Forms Are Just as Good." Okay, Watch This.
Reactive Forms work, but complex forms become messy with imperative state management, verbose error handling, and scattered validation logic. Angular's Signal Forms API provides a cleaner, more reactive approach that reduces code complexity, improves type safety, and simplifies form state management. This tutorial demonstrates a real-world form migration, showing side-by-side comparisons that highlight why Signal Forms are better for modern Angular applications.
Angular Signal Forms Tutorial Series:
- Migrate to Signal Forms - Start here for migration basics
- Custom Validators - Add custom validation to Signal Forms
- Async Validation - Handle async validation in Signal Forms
- Cross-Field Validation - Validate across multiple fields
- State Classes - Use automatic state classes
What This Form Needs to Do
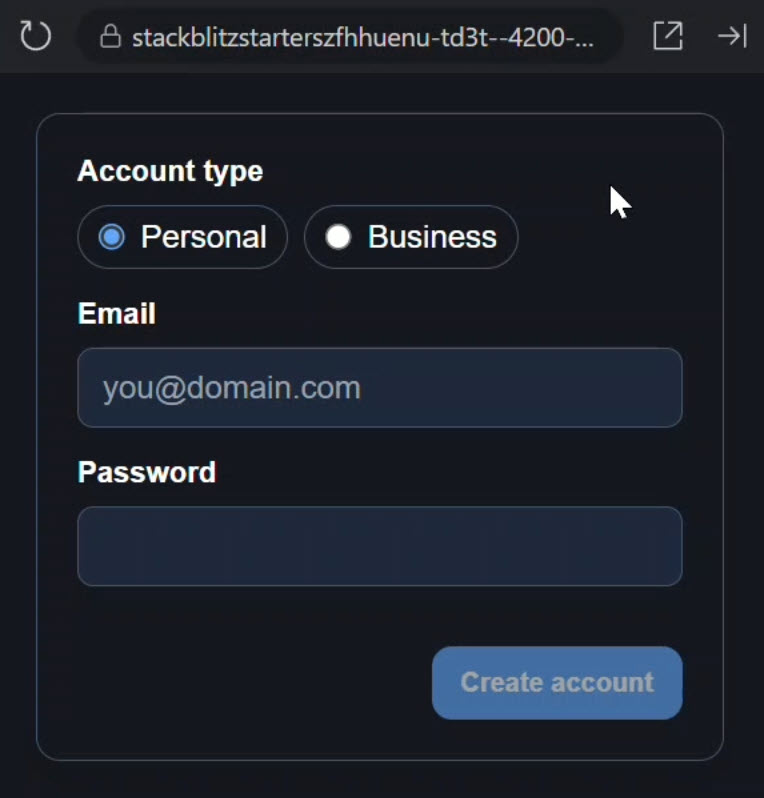
For this demo, we’re going to work with an existing form that allows a user to create an account:
When I switch this account type to Business, we automatically get a Company Name field added:
This is what we call conditional form structure. Super common, but can get super messy.
Then we have a password field with a password strength meter:
The stronger the password becomes, the more this fills.
The form also knows when it should not submit:
We can’t submit yet because it’s still not in a valid state.
Now when we type in an email, if it’s not valid, we get an error message:

Then, once it’s valid, the error message goes away, our form becomes valid, and the button activates.
So this is a pretty dynamic form. And it works well.
But the way we currently have this built uses Reactive Forms, and to get all of this behavior working, the code gets a little wild.
How This Was Built With Reactive Forms
Let’s take a look at what it takes to make all of that actually work.
First, let’s open our form component’s TypeScript.
Here we’re importing the ReactiveFormsModule and injecting the NonNullableFormBuilder:
import { ChangeDetectionStrategy, Component, DestroyRef, inject, OnInit } from '@angular/core';
import { NonNullableFormBuilder, Validators, ReactiveFormsModule, FormControl } from '@angular/forms';
import { map } from 'rxjs';
import { takeUntilDestroyed } from '@angular/core/rxjs-interop';

@Component({
  selector: 'app-form',
  templateUrl: './form.component.html',
  styleUrl: './form.component.scss',
  changeDetection: ChangeDetectionStrategy.OnPush,
  imports: [ReactiveFormsModule],
})
export class FormComponent implements OnInit {
  private fb = inject(NonNullableFormBuilder);
  private destroyRef = inject(DestroyRef);
Then we have a set of variables used to track various states in this component:
protected isBusiness = false;
protected passwordStrength = 0;
protected canSubmit = false;
Then below this, we have our form structure created as a form group using the form builder:
protected form = this.fb.group<AccountForm>({
  ...
});
We have a control for the account type that’s required:
accountType: this.fb.control<AccountType>('personal', {
  validators: [Validators.required]
})
We have a control for the Company Name that’s not required initially:
companyName: this.fb.control('')
We have a control for the Email that is both required and then uses an email validator to check for the proper format:
email: this.fb.control('', {
  validators: [Validators.required, Validators.email]
}),
Then we have a password control that is required and then has a minLength validator as well, requiring it to be at least 8 characters long:
password: this.fb.control('', {
  validators: [
    Validators.required,
    Validators.minLength(8)]
})
So that’s how we initialize our form, but after this is where things get spicy.
In order to pull off all of the custom logic that this form has, we now have several observable subscriptions for different aspects of this form.
First, we listen to changes in the Account Type control to decide whether the Company Name should be required, and if not, we clear validators, reset the value, and remember to call updateValueAndValidity() so the form knows about it:
this.form.get('accountType')?.valueChanges.subscribe(value => {
  const companyNameControl = this.form.get('companyName');
  if (value === 'business') {
    companyNameControl?.setValidators(Validators.required);
    this.isBusiness = true;
  } else {
    companyNameControl?.clearValidators();
    companyNameControl?.reset();
    this.isBusiness = false;
  }
  companyNameControl?.updateValueAndValidity();
});
Then we subscribe again to compute password strength and update whether the form can submit:
this.form.get('password')!.valueChanges
  .pipe(
    map(v => this.score(v || '')),
    takeUntilDestroyed(this.destroyRef)
  )
  .subscribe(s => {
    this.passwordStrength = s;
    this.updateCanSubmit();
  });
Then we have one more subscription to track the overall form validity:
this.form.statusChanges
  .pipe(takeUntilDestroyed(this.destroyRef))
  .subscribe(() => this.updateCanSubmit());
At this point we are no longer just using the form. We’re babysitting it.
We’re keeping all of this state in sync manually.
After these subscriptions, we have a couple of helper methods:
One to determine if we can submit:
private updateCanSubmit() {
  this.canSubmit = this.form.valid && this.passwordStrength >= 3;
}
Then we have another to check the strength of the password:
private score(v: string): number {
  return (+(v.length >= 8) +
    +/[A-Z]/.test(v) +
    +/[0-9]/.test(v) +
    +/[^A-Za-z0-9]/.test(v));
}
Okay, so that’s the TypeScript. Now let’s look at the template.
The Reactive Forms Template Setup
To start, we’re wiring up our form with the formGroup directive on the form element that wraps all of our fields:
<form [formGroup]="form" (ngSubmit)="submit()">
  ...
</form>
Then, to wire up our form controls, we’re using the formControlName directive and then the name of the control within the form group:
<input type="radio" value="personal" formControlName="accountType" />
Then, we have a condition for when we do have a Business Account which controls the visibility of the Company Name field:
@if (isBusiness) {
  <div class="row">
    <label class="lbl" for="company">Company</label>
    <input
      id="company"
      type="text"
      formControlName="companyName"
      name="no-autocomplete"
      autocomplete="none"
      autofill="none" />
  </div>
}
Below this we have the Email field where we also have a condition based on the touched and invalid status of the control that determines whether to show the email validation message:
<div class="row">
  <label class="lbl" for="email">Email</label>
  <input
    id="email"
    type="text"
    placeholder="you@domain.com"
    formControlName="email"
    name="no-autocomplete"
    autocomplete="none"
    autofill="none" />
  @let email = form.get('email');
  @if (email && email.touched && email.invalid) {
    <div class="help">Enter a valid email.</div>
  }
</div>
Then we have our Password field where we also have our password strength meter:
<div class="row">
  <label class="lbl" for="pw">Password</label>
  <input id="pw" type="password" formControlName="password" />
  <div class="meter" [style.--score]="passwordStrength"></div>
</div>
And below all of this we have our submit button, which is disabled when our canSubmit property is false:
<button type="submit" [disabled]="!canSubmit">
  Create account
</button>
This is all fine and dandy. It all works, and has worked well in the past.
The complicated part isn’t here in the template, it’s everything we had to write to support it.
Let’s redo this using Signal Forms, and watch how much of this code disappears.
What Signal Forms Is (and Isn’t)
Signal Forms is a new experimental forms API in Angular that models forms using signals instead of FormGroups and FormControls.
It’s not production-ready yet (so don’t go replacing your company’s checkout flow tomorrow), but it’s far enough along to understand the direction Angular is heading.
And the direction is:
Less wiring. Less bookkeeping. More direct state.
Let’s convert this form.
Rewriting the Form Using Signal Forms
Back over to our TypeScript, we can now remove:
- The Form Builder and Destroy Ref. We won’t need these anymore.
- The entire form group.
- All of the observable subscriptions.
- The OnInit method and interface.
- The Reactive Forms module import.
- All unused imports from the top.
Whew, that’s a lot of stuff to remove!
Now the first thing we need to do is update our AccountForm interface.
Instead of form controls, these will just be the accountType type for the Account Type control, and strings for everything else:
type AccountType = 'personal' | 'business';

interface AccountForm {
  accountType: AccountType;
  companyName: string;
  email: string;
  password: string;
}
Defining the Form Model as a Signal
Now with reactive forms, we use the Form Builder, groups, and controls, but with Signal Forms we use a signal to track the form state.
So let’s create a new signal called formModel and type it with our AccountForm interface:
formModel = signal<AccountForm>({
  ...
});
Now we can initialize each of the properties in this object.
For our accountType we’ll make it “personal”, and then for all other fields we’ll initialize them as an empty string.
formModel = signal<AccountForm>({
  accountType: 'personal',
  companyName: '',
  email: '',
  password: ''
});
So that’s the signal to store our form state.
Creating the Signal-Based Form Structure
Now, in order to make this into a form when using Signal Forms, we need to create another property where we use the new form() function to wrap this form state signal:
import { form } from '@angular/forms/signals';

protected form = form(this.formModel, p => {
  ...
});
This function creates what’s known as a field tree, but uses our formModel signal as the source of truth for the values of our form.
To add validation, we need to pass in some options.
First, we’ll use the new required() method to make our Account Type field required:
import { ..., required } from '@angular/forms/signals';

required(p.accountType);
Then we’ll use the required() method again to make our Email field required:
required(p.email);
Next, we’ll use the new email() function to make sure our Email is in the proper format:
import { ..., email } from '@angular/forms/signals';

email(p.email);
Then we’ll use the required() method one more time to make our Password field required:
required(p.password);
Then we’ll use the minLength() function on our Password field to set the min length to 8 characters again:
import { ..., minLength } from '@angular/forms/signals';

minLength(p.password, 8);
Okay, the last thing we need to do in our form is make the Company Name field required when our Account Type equals “business”.
With Reactive Forms, we used to listen to the value change of the Account Type control and then add or remove the validators and update the validation state.
Well, this gets more simplistic with Signal Forms.
We can use the applyWhenValue() method to conditionally apply validation to our company name control.
applyWhenValue(p,
  m => m.accountType === 'business',
  q => required(q.companyName)
);
This one function here replaces the entire Account Type subscription from earlier.
No updating validators. No resetting. Just describe the rule once.
Okay, so that’s our form. Now we need to update the rest of these properties as well.
Deriving UI State with Computed Signals
We’ll switch the isBusiness property to a computed() signal where we can use the accountType control value since it’s a signal to check if it’s value is “business”:
protected isBusiness = computed(() =>
    this.form.accountType().value() === 'business');
This property now derives itself. We never set it manually.
This is one of the main benefits of using signal forms. They are now signals. So we can do things like use computed signals, or linked signals, or even effects if we need to along with form controls.
Okay, now for our passwordStrength field, we will also convert this to a computed signal.
Here we will actually copy the guts of the score() method and then we can remove that method.
Instead, we’ll use this in our computed signal, but we’ll use the Password control value as a signal now:
protected passwordStrength = computed(() => {
  const v = this.form.password().value() ?? '';
  return (+(v.length >= 8) +
    +/[A-Z]/.test(v) +
    +/[0-9]/.test(v) +
    +/[^A-Za-z0-9]/.test(v));
});
Okay, now we will update the canSubmit property to also be a computed signal.
This signal will update based on our form signal validity and also whether the password strength value is greater than or equal to 3.
protected canSubmit = computed(() =>
    this.form().valid() && this.passwordStrength() >= 3);
Now we’re going to use the new Field directive from the signal forms API in the template, so the last thing we need to do here is add this to our component imports array:
import { ..., Field } from '@angular/forms/signals';

@Component({
  selector: 'app-form',
  ...,
  imports: [Field]
Okay, that should be everything we need here.
I’m hoping if you didn’t see the overall benefit and gains before that you see them clearly now.
This is quite a bit less code than it was before and it integrates seamlessly with Angular’s new reactivity model, signals.
Now it’s time to switch over and update the template.
Updating the Template to Use the Field Directive
Now the changes here will not be near as significant as they were in the TypeScript, but we’ll go through them step-by-step.
First up, we can remove the form group directive that was bound to our old form property since it’s no longer needed.
Then on every input that uses the old formControlName directive, we need to update these to all use the new field directive and then access the control off of our new form property:
Before:
<input formControlName="accountType" />
After:
<input [field]="form.accountType" />
Okay, now we need to update the isBusiness condition to use the signal:
@if (isBusiness()) {
  ...
}
We also need to update the email validation message logic to use signals now too:
@let email = form.email();
@if (email.touched() && email.invalid()) {
  <div class="help">Enter a valid email.</div>
}
Then we also need to switch the password strength property to a signal too:
<div [style.--score]="passwordStrength()"></div>
Then all we need to do is update the disabled binding on our submit button:
<button [disabled]="!canSubmit()">Create Account</button>
So the situation here in the template is not really all that different.
It’s not like a great reduction of code or anything. It’s just converted over to signals and the new syntax.
Overall, not much of a change here, but this is how you do it with Signal Forms.
Side-by-Side Behavior Check (Reactive vs Signal)
Okay, this should be everything we need to change, so let’s go ahead and save and try this out.
And what we should see is the same UI. Same behavior. Just, using signals now.
Alright, let’s click to switch the type, nice, this still works:
It shows the company name field just like it should.
All right, let’s try the password:
And that still works too, great!
And we can see that the create account button is still disabled like it should be:
Then, let’s try our email validation:
Nice, that still works!
And then, once it’s valid, the form becomes valid, and the button is enabled!
So the code went from: “Listen… check… update… sync… track… remember…” to “Describe the state. The UI follows it.”
Why This Matters (The Real Benefit)
So the form didn’t change. The work did.
With Reactive Forms, we had to wire everything together: subscribe here, toggle validators there, track UI state manually.
With Signal Forms, we just describe the state once, and the UI follows automatically.
Same behavior. Less code. Clearer logic.
And as your forms get more complex, that benefit only gets bigger.
In Conclusion
Signal Forms represents a significant shift in how we think about forms in Angular.
Instead of managing subscriptions and manually syncing state, we describe the form’s behavior declaratively, and Angular’s reactivity system handles the rest.
The benefits become even more apparent as forms grow in complexity.
Less boilerplate, clearer intent, and seamless integration with Angular’s signal-based reactivity model make Signal Forms the future of form handling in Angular.
While it’s still experimental, it’s worth exploring now to understand where Angular is heading.
The patterns you learn today will serve you well as the API matures.
If this helped you, be sure to subscribe and leave a comment, it really helps other Angular developers find this content.
And hey — if you want to rep the Angular builder community, check out the Shieldworks “United by Craft” tees and hoodies here. They’re built for the ones who code like it’s a trade!
Additional Resources
- The demo app BEFORE any changes
- The demo app AFTER making changes
- Angular Signal Forms GitHub (Experimental)
- Angular FormBuilder Docs
- My course “Angular: Styling Applications”
- My course “Angular in Practice: Zoneless Change Detection”
- Get a Pluralsight FREE TRIAL HERE!
Try It Yourself
Want to experiment with the final version? Explore the full StackBlitz demo below.
If you have any questions or thoughts, don’t hesitate to leave a comment.