Angular effect(): When NOT to Use It and Better Alternatives
Angular's effect() function is often misused, leading to performance issues, unnecessary side effects, and code that's harder to reason about. While effects seem like an easy solution for reacting to signal changes, most scenarios have better alternatives using computed signals, template bindings, or lifecycle hooks. This tutorial shows you when NOT to use effects, demonstrates common anti-patterns, and provides better solutions for each scenario. You'll learn to write more efficient, maintainable Angular code.
Angular Signals Tutorial Series:
- Angular Signals & effect() - Learn about the effect() function
- Create Signals with computed() - Learn about computed signals
- Signal Inputs & output() - Replace @Input/@Output with signals
Where We Started: A Look at the Original Example
In a previous tutorial, I covered an example where there were some components with Reactive Forms.

In this example, the sign-in form component has a signal-based input named “disabled”:
disabled = input(false);
In that tutorial I converted this from the old decorator-based input where the component was also using the ngOnChanges lifecycle hook to enable and disable the form group programmatically based on the value of that input:
@Input() disabled = false;

ngOnChanges(changes: SimpleChanges) {
    if (changes['hasEmployeeId'] || changes['disabled']) {
        this.showEmployeeId = this.hasEmployeeId && !this.disabled();
    }
}
I essentially replaced the ngOnChanges implementation with the effect function instead:
disabled = input(false);

constructor() {
    effect(() => {
         this.disabled() ? this.form.disable() : this.form.enable();
    });
}
An effect seemed like the right choice because, the input became a signal, so I needed to react when the signal value changes, and that reaction was to enable or disable the form with a method call on a Form Group.
This really seems like the best way to do this sort of thing based on our current toolset in Angular. And based on the fact that we don’t yet have a signal-based forms module, which is hopefully in the works.
Now, there could definitely be a better way to do this. If so, I would love to see an example.
But for now, I’ll assume that this is an acceptable use case for the effect function, and I’ll leave it as is.
A Real-World Example: Adding a Conditional Employee ID Field
But, in order to demonstrate an example of when NOT to use the effect function, I’m going to change this concept a little.
I’m going to switch this form that’s so that it includes an option to use an employee id:

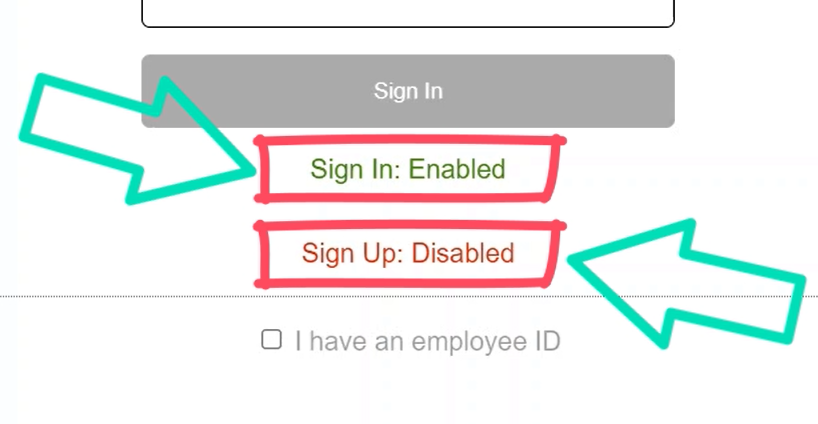
Just like before, I’m still including the disabled status of the two form components in the UI:

Currently the sign-in form is enabled, and the sign-up form is disabled.
This is all still happening from the “disabled” signal input and the effect function code that we just saw.
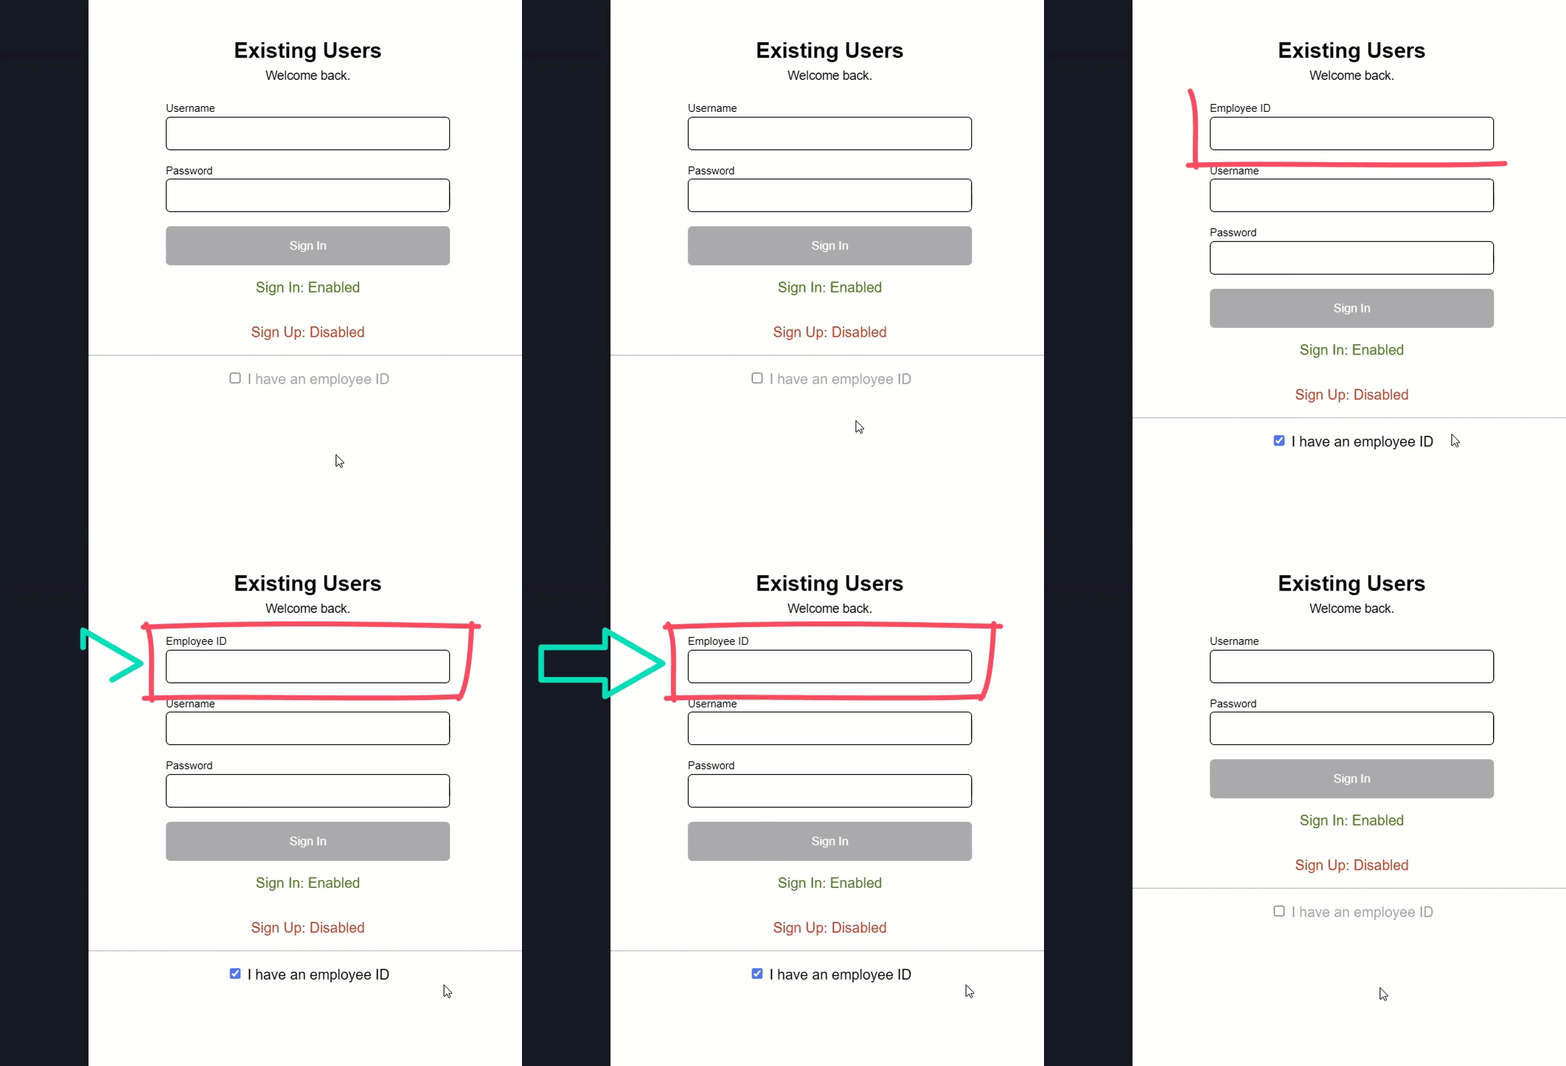
When we click to toggle the checkbox, we can see that an “Employee ID” field gets added to the form:

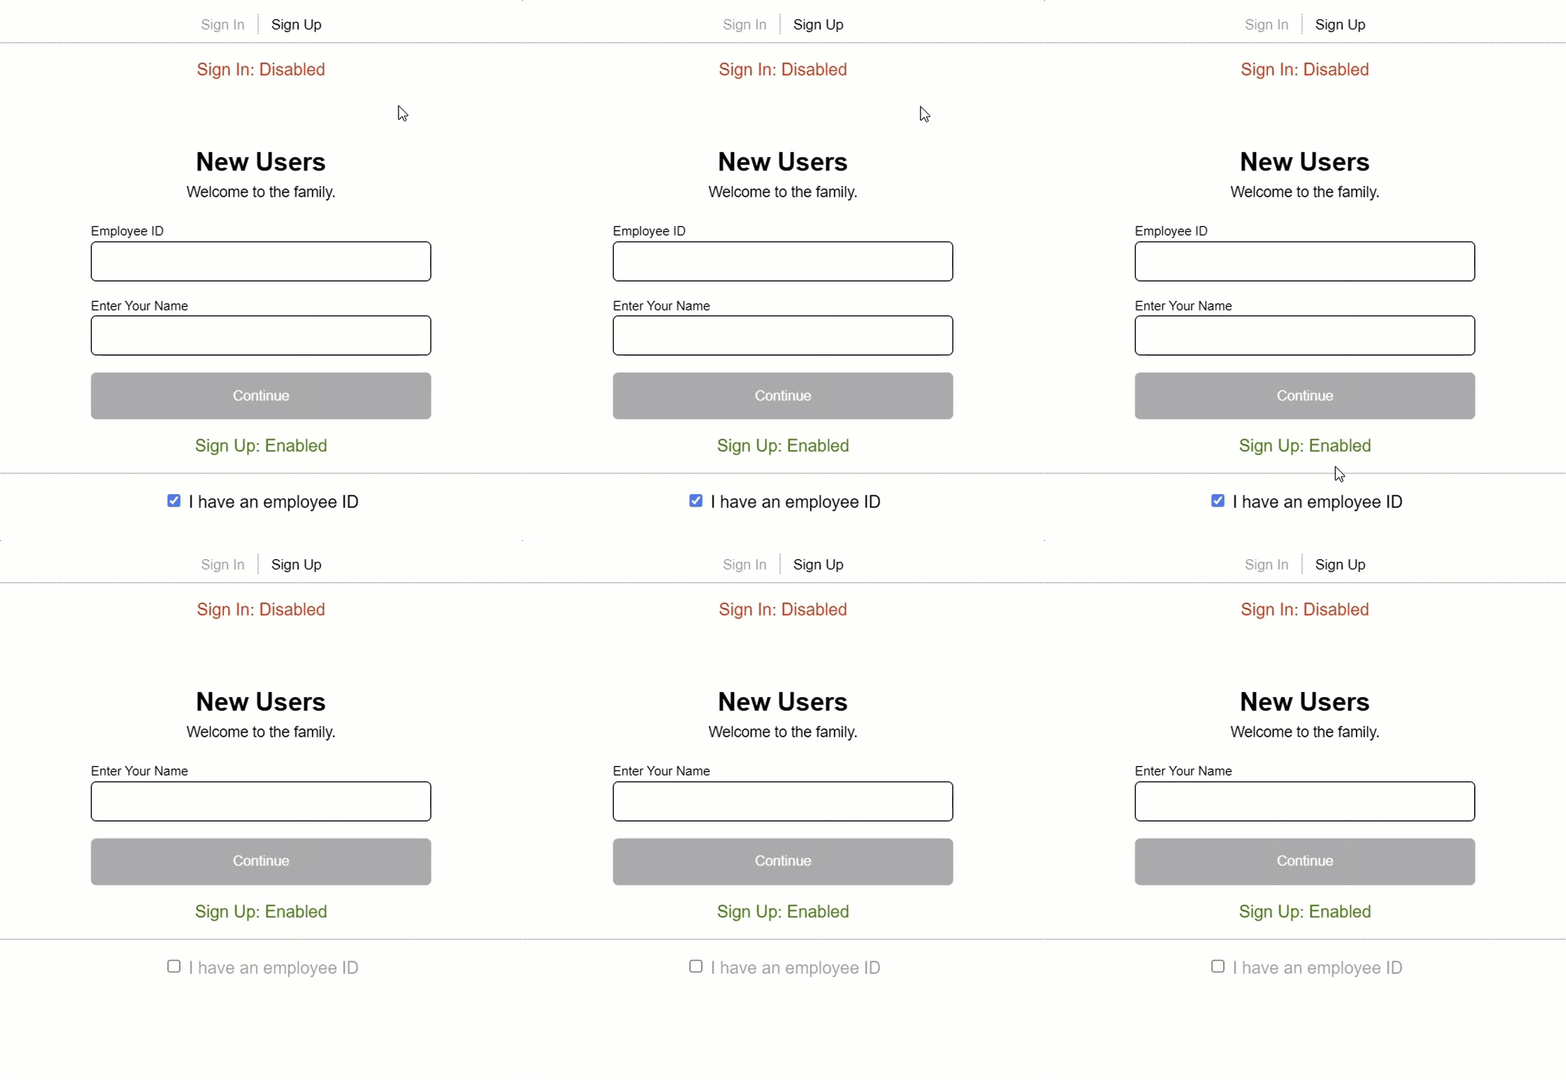
Then, when we switch to the sign-up form component, the enabled forms swap and we also see an employee id field here too:

If we toggle the checkbox, we can see the id field is removed:

So that’s what happens in the UI. Let’s look at the code to better understand what’s happening here.
In the root app component, we have a checkbox input that, when toggled, sets a “hasEmployeeId” boolean signal to the opposite of its current value:
<label>
    <input (change)="hasEmployeeId.set(!hasEmployeeId())" type="checkbox" />
    <span>I have an employee ID</span>
</label>
This signal is then passed as an input to each of the form components:
<app-sign-in-form [hasEmployeeId]="hasEmployeeId()" ...></app-sign-in-form>
<app-sign-up-form [hasEmployeeId]="hasEmployeeId()" ...></app-sign-up-form>
Now let’s look at the code for the sign-in component.
Here is the “hasEmployeeId” input:
@Input() hasEmployeeId = false;
Now this input is still set up as a decorator-based input, but we’re going to change that in a minute.
Also, we have this “showEmployeeId” boolean property:
protected showEmployeeId = false;
Then, we have the ngOnChanges method here again:
ngOnChanges(changes: SimpleChanges) {
    if (changes['hasEmployeeId'] || changes['disabled']) {
        this.showEmployeeId = this.hasEmployeeId && !this.disabled();
    }
}
When the “hasEmployeeId” or “disabled” inputs change, we update the value of the “showEmployeeId” property.
Now, if we switch over to the template, here we can see that we conditionally display the employee id field based on the value of the “showEmployeeId” property:
<div *ngIf="showEmployeeId">
    <label>Employee ID</label>
    <input type="text" />
</div>
So that’s how it works currently.
Now we’re going to switch this concept over to signals and we’re going to remove the ngOnChanges lifecycle hook when we do so.
The Wrong Way: Using an Effect to Update This Property
The first thing we should do is switch the “hasEmployeeId” input to a signal using the input function instead:
Before:
@Input() hasEmployeeId = false;
After:
hasEmployeeId = input(false);
Now, we need to add parenthesis to its usage in the ngOnChanges method as well:
ngOnChanges(changes: SimpleChanges) {
    if (changes['hasEmployeeId'] || changes['disabled']) {
        this.showEmployeeId = this.hasEmployeeId() && !this.disabled();
    }
}
And that’s it, this is now a signal.
Next, we want to convert the “showEmployeeId” property to a signal as well.
To do this we can use the signal function.
We’ll need to be sure to import it from @angular/core, and we’ll start with an initial value of false:
import { ..., signal } from "@angular/core";

showEmployeeId = signal(false);
Then we need to use the set method in the ngOnChanges method instead:
ngOnChanges(changes: SimpleChanges) {
    if (changes['hasEmployeeId'] || changes['disabled']) {
        this.showEmployeeId.set(this.hasEmployeeId() && !this.disabled());
    }
}
And for this property, we also need to update the template:
@if (showEmployeeId()) {
    <label>
        <strong>
            Employee ID
        </strong>
        <input type="text" formControlName="employeeId" />
    </label>
}
This property is now a signal too.
Now, we want to replace the ngOnChanges lifecycle hook concept for this and instead use a more modern, signals-based approach right?
This means we should use an effect right?
Well, let’s see.
Let’s add a new effect function in the constructor. Then, let’s move the logic for this into this new effect:
effect(() => {
    this.showEmployeeId.set(this.hasEmployeeId() && !this.disabled());
})
Then we can remove the ngOnChanges method and it’s imports too.
Ok, that should be it right?
Let’s save and see how it works:

Well, it looks like we have something wrong because, when we click on the checkbox, we’re not seeing the employee id field.
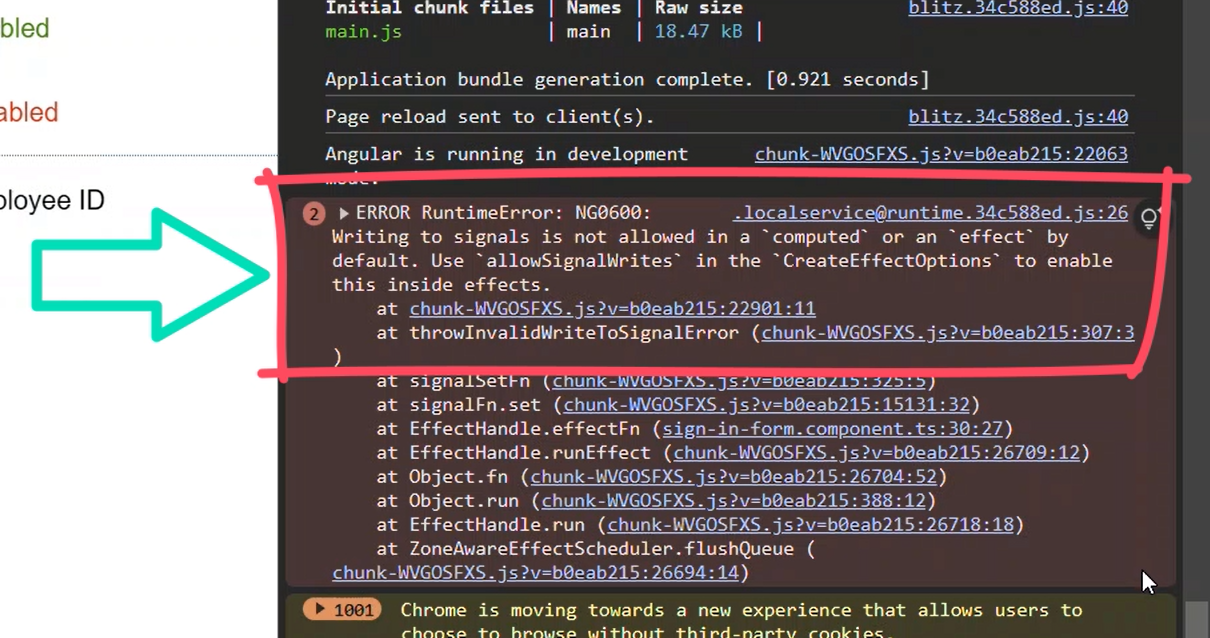
To better understand what’s going on here let’s look at the console in the Chrome Dev Tools:

Ok, there it is, we’re getting a runtime error with the way that we’re setting our signal within the effect.
But it’s also telling us that we a have a way around this by setting “allowSignalWrites” within the options for our effect function.
So, we should do that right?
Sure, why not.
Using allowSignalWrites to Update Signals in an Effect
To do this, we just need to add the options parameter to our effect function, and then set “allowSignalWrites” to true:
effect(() => {
    this.showEmployeeId.set(this.hasEmployeeId() && !this.disabled());
}, { allowSignalWrites: true });
That’s all we should need to do.
Let’s save and see if it’s working correctly now:

Nice, now we’re properly toggling the field again.
So, this works, but it’s not actually what we want to do in this case.
Actually, this is probably almost never what we want to do.
But, Don’t Do This!
You really shouldn’t use this approach unless you absolutely have to.
If you don’t deeply understand signals and effects and how they work under the hood, you shouldn’t update signal values in an effect like this.
You could potentially cause major performance degradation by triggering way more change detection cycles than actually needed due to their asynchronous nature.
So, probably, don’t use it.
In this case, we definitely have a better way.
We have something that is specifically designed to set a signal value, based on the values of other signals, and it automatically updates when those other signals change.
This concept is a computed signal.
The Right Way: Using the Computed Function to Create a Signal Based on Another Signal
Computed signals should be used when the value needed can be derived from existing signals, synchronously.
And this is what we have here.
To switch to a computed signal, we’ll switch from the signal function to the computed function instead, and we need to be sure that it gets imported from the @angular/core module too:
import { ..., computed } from "@angular/core";

showEmployeeId = computed();
This function will return a signal from the logic we put within it.
So, in this case, we can simply move our logic into this function instead of the effect:
showEmployeeId = computed(() => this.hasEmployeeId() && !this.disabled());
Now, whenever either of these signal values change, this signal will automatically update using the new values for each signal.
That’s all we need to do for this.
So, let’s save and see how it works now:

Ok, looks like it’s working exactly like we want but now it’s done in the correct way for this example, using computed signals.
In Conclusion
So, effects are really only for handling things related to signals that there’s no other way to do.
In this tutorial we saw one example, but others may include things like manipulating the DOM, or using a third-party charting library, etcetera.
And the reality is, you’ll rarely need them.
Also, you pretty much never want to set another signal within an effect unless you deeply understand how both signals and effects work.
Alright, I hope you found this tutorial helpful!
Don’t forget to check out my other Angular tutorials for more tips and tricks.
Additional Resources
- The previous tutorial
- The demo BEFORE making any changes
- The demo AFTER making changes
- Angular Effect function documentation
Want to See It in Action?
Check out the demo code and examples of these techniques in the Stackblitz example below. If you have any questions or thoughts, don’t hesitate to leave a comment.


