Can linkedSignal Use Multiple Sources? Yes, Here’s How!
Combining multiple reactive sources in Angular often requires complex RxJS operator chains, creating hard-to-maintain code. Angular's linkedSignal() simplifies this by creating writable signals that derive from multiple sources, enabling two-way binding scenarios and complex reactive patterns without Observable complexity. This tutorial demonstrates how to use linkedSignal() to combine multiple signals, create reactive two-way bindings, and build modern Angular components with cleaner, more maintainable code.
See the Product Filter in Action
Let’s start by looking at what we’re working with, for this tutorial we have a basic product search:
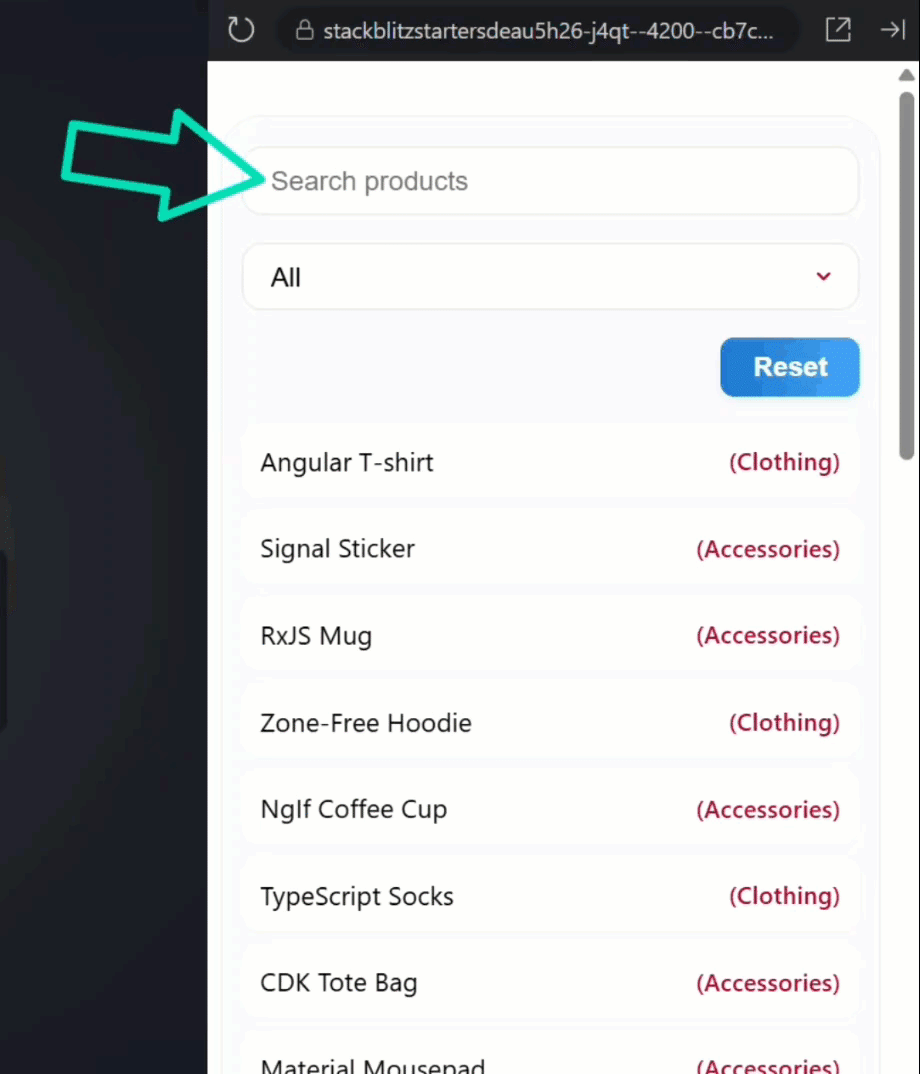
It has a product filter search box, category dropdown, and a big list of Angular-themed merch.
When we type in the form, the list gets filtered down.
Then we can choose a category to further filter it all down.
We also have a reset button… when we click it the controls and the list reset back to their original state.
This all works fine, but let’s look at how it’s wired up under the hood.
How the Observable Approach Works in Angular
First up, let’s check out the template for this component.
For this example, we’re not using Angular forms, just standard HTML form controls with values and events to update state and filter results.
Here’s our search field:
<input
    #form
    type="text"
    [value]="search | async"
    (input)="updateSearch(form.value)"
    placeholder="Search products">
For the value, we’re using a “search” observable with the async pipe.
Then, when the “input” event fires (when we type in the field), we call an “updateSearch()” method and pass it the value from our field.
Then we have the category select with the same, a “category” observable for the value with the async pipe, and then when the category is changed, we call an “updateCategory()” method:
<select
    #filter
    [value]="category | async"
    (change)="updateCategory(filter.value)">
    ...
</select>
Then we have the reset button that calls a “reset()” method when clicked:
<button (click)="reset()">Reset</button>
Finally, for the product list, we have a @for block using a “filteredProducts” observable with the async pipe as well:
<ul>
    @for (product of filteredProducts | async; track product.name) {
        <li>...</li>
    }
</ul>
RxJS State Management in Angular Components
So that’s the HTML, but on the TypeScript side, things are looking pretty RxJS-y.
Here, we’ve got “search” and “category” as BehaviorSubjects:
protected search = new BehaviorSubject<string>('');
protected category = new BehaviorSubject<string>('');
Think of these as observable boxes that hold our latest search and category values.
Then, we have the “updateSearch()” and “updateCategory()” methods that are used to set the new values into those subjects whenever the user types or selects something:
protected updateSearch(search: string) {
    this.search.next(search);
}

protected updateCategory(category: string) {
    this.category.next(category);
}
Below these, we have the “reset()” method that resets the search and category observables to empty strings:
protected reset() {
    this.search.next('');
    this.category.next('');
}
And then we have the “filteredProducts”, which is a combo observable created with combineLatest:
protected filteredProducts = combineLatest([
      this.search,
      this.category
    ]).pipe(
        debounceTime(300),
        map(([search, category]) => {
            const term = search.toLowerCase();
            return this.products.filter(
                p =>
                  (!category || p.category === category) &&
                  (!term || p.name.toLowerCase().includes(term))
        );
    }),
    takeUntilDestroyed()
);
This listens for both the search and category changes, pipes them through a debounceTime so we don’t filter on every keystroke, then runs the filter logic.
Everything is glued together with the async pipe in the template.
This works, and honestly, it’s not a bad pattern if you’re living in RxJS-land.
But Angular has moved on, and so can we.
Refactoring Observables to Signals in Angular
Let’s upgrade this to the new signals API.
If you’re new to signals, I’ll try to explain things as I go, so don’t worry, I’ve got your back.
First, let’s swap out the search and category BehaviorSubjects for signals.
To do this, we just need to use the signal() function from Angular core:
import { ..., signal } from '@angular/core';

protected readonly search = signal('');
protected readonly category = signal('');
That’s it! Now, search and category are signals.
Now, since we’re using signals for these, our updateSearch and updateCategory methods can be removed.
We won’t need them anymore.
Now let’s switch over to the template.
Instead of using the async pipe and passing the value to an update function, we can bind the value to the new “search” signal and then update it directly with the “set” function:
<input
    #form
    type="text"
    [value]="search()"
    (input)="search.set(form.value)"
    placeholder="Search products">
Same deal for the category:
<select
    #filter
    [value]="category()"
    (change)="category.set(filter.value)">
    ...
</select>
Signals are functions, so we call them with parentheses to read the value, and use the “set” method to update their values.
Okay that’s all we need to do here, but now we need to update our filtering logic.
Combine Multiple Signals with linkedSignal
Let’s switch back over to the TypeScript.
Instead of an RxJS pipeline, we’re going to use Angular’s new linkedSignal().
This lets us create a writable signal that also updates based on another signal.
So, if you’ve ever seen or used linkedSignal() before, you’re probably familiar with the fact that you have a source signal and then a computation that will run when this source signal changes:
import { ..., linkedSignal } from '@angular/core';

protected readonly filteredProducts = linkedSignal({
    source: this.search,
    computation: () => {}
});
It’s pretty cool right?
But in this case, we have a problem.
We are relying on more than one source signal, right?
We have the search value but then also the category and when either of these change, we need to update the filtered products.
Here’s where it gets really cool: we can actually add multiple source signals.
Instead of passing a single signal to the source, we pass a function that returns an object with both signal values:
protected readonly filteredProducts = linkedSignal({
    source: () => ({
        search: this.search(),
        category: this.category()
    }),
    computation: ({ search, category }) => ()
});
Now, our computation receives both search and category, so we can use those to properly filter the products.
Organizing Filter Logic for Clean Code
To keep things tidy, let’s create a helper method for our filter logic.
Let’s call it “updateFilteredProducts()” and add parameters for the search term and the category.
Then, we can move our filtering logic into this method and remove the old set up for this:
private updateFilteredProducts(search: string, category: string) {
    const term = search.toLowerCase();
    return this.products.filter(
        p =>
            (!category || p.category === category) &&
            (!term || p.name.toLowerCase().includes(term))
    );
}
Okay, then we’ll use this in our linkedSignal() computation:
protected readonly filteredProducts = linkedSignal({
    source: () => ({
        search: this.search(),
        category: this.category()
    }),
    computation: ({ search, category }) =>
        this.updateFilteredProducts(search, category)
});
So now we will properly filter our results, all signals based.
When either of these signals change, we will update the “filteredProducts” signal based on the values of both signals.
How to Debounce Signals with RxJS in Angular
But here’s a question: how do we debounce signal updates so we don’t filter on every keystroke?
Well as far as I know, Angular’s signals don’t have built-in debounce yet, but the quickest way to do this is with the new signal/observable interop.
To do this, we’ll create a new signal, let’s call it “debouncedSearch”.
What we’re going to do is create an observable so that we can use the debounceTime() operator.
Then we’ll convert this observable back to a signal.
So, we’ll use the toSignal() function.
This converts an observable to a signal.
Then we’ll use the toObservable() function which does the opposite, it converts a signal to an observable.
Once it’s an observable, we can add pipe(), and then use the debounceTime() operator to debounce this with a 300 millisecond timer:
private readonly debouncedSearch = toSignal(
    toObservable(this.search).pipe(debounceTime(300)),
    { initialValue: '' }
);
This is pretty funny, right? But it works pretty well.
Now there may totally be a better way to do this, and if there is please let me know!
Okay now, in our linkedSignal(), instead of using the raw search, we’ll use debounced search in the source:
protected readonly filteredProducts = linkedSignal({
    source: () => ({
        search: this.debouncedSearch(),
        category: this.category()
    }),
    computation: ({ search, category }) =>
        this.updateFilteredProducts(search, category)
});
Now that all of these are signals, we can update the reset function to reset all of them:
protected reset() {
    this.search.set('');
    this.category.set('');
    this.filteredProducts.set(this.products);
}
This could probably be done more elegantly, but this will work for this example.
The key here is that linkedSignal() can also be written to.
It’s like a mix of a computed() signal that updates when other signals are updated, and a normal writable signal whose value can be set directly like we’re doing here.
Cleanup: From Observables to Signals
Now that we’re using signals instead of observables and async pipes, we should remove the async pipe and any other unused imports from the component too.
Next, we just need to switch over to the template and update our filteredProducts to the signal, no more async pipe:
<ul>
    @for (product of filteredProducts(); track product.name) {
        <li>...</li>
    }
</ul>
Okay, hopefully that’s everything we need, let’s save and check it out:
Nice! Looks like it all works just like it did before with observables, but now it’s done in a more modern, reactive way, with signals.
Final Thoughts: Modern, Reactive, and Ready for the Future
So now, our code is simpler and easier to reason about.
We went from manual RxJS pipelines to a fully reactive, declarative approach using signals and linkedSignal().
The old RxJS way works, but Angular’s new signal-based reactivity is just cleaner.
You can use this pattern anywhere you need to react to multiple sources: filters, forms, dashboards… you name it.
If you found this helpful, don’t forget to subscribe and check out my other Angular tutorials for more tips and tricks!
Additional Resources
- Dependent state with linkedSignal
- Angular Signals
- RxJS interop with Angular signals
- More Videos on Signals in Angular
- My course: “Angular: Styling Applications”
Want to See It in Action?
Want to experiment with the final version? Explore the full StackBlitz demo below. If you have any questions or thoughts, don’t hesitate to leave a comment.